User Guide

Media Management: Manage iOS/Android Photos


With Wondershare MobileGo, you're able to transfer photos to and from your Android device, capture any screen and delete unwanted photos in batches to free up space. Follow the detailed tutorial and try it yourself later.

Note: the interface of MobileGo for Android users is a little different from when it's for iOS users, the functions for photo management are the same.

Take Android for example, please download and run Wondershare MobileGo on your computer. Connect your Android device to computer by using a USB cable or over WiFi. Your Android device will be recognized and displayed in the primary window. Fail to connect? Fix it here>>

moblego home


1

Transfer Photos from Computer to Android

Step 1. Simply click on Photos in the left column. Under Photos category, select Camera or Library. All photos, excluding the ones you take, are collected in the Library category.

Step 2. In the corresponding photo management window on the right, click the triangle under Add > Add File or Add Folder.

Step 3. The Windows file browser window appears. Navigate to the folder where your desired photos are saved. Tick the photos and click Open to transfer to your Android device.

transfer photos from computer to android

2

Transfer Photos from Android to Computer

Step 1. Simply click on Photos in the left column.
Step 2. In the corresponding photo management window on the right, choose your desired photos and click Export.
Step 3. In the pop-up file browser window, choose a save path to store the photos to computer.

export videos from android to computer

3

Capture Android Screen

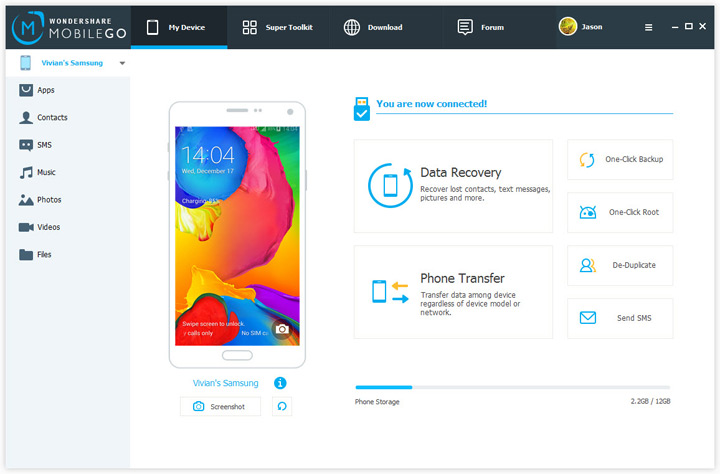
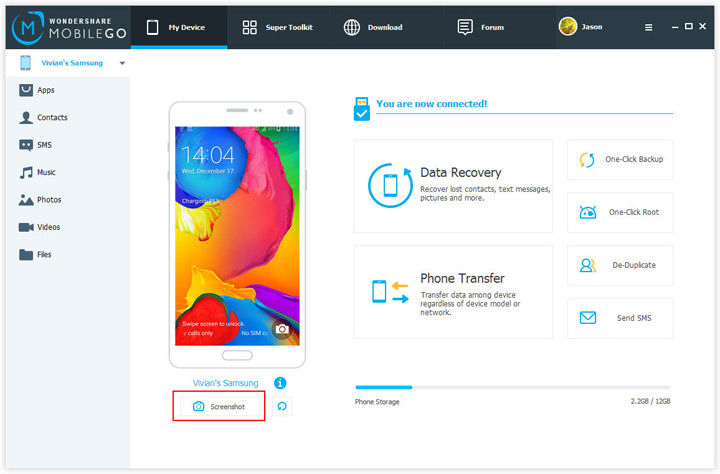
Wondershare MobileGo enables you to do Android screen capture with a single click. Follow the steps below.

Step 1. On the primary window, click android screen capture to capture the current screen on your Android phone or tablet.

screen capture on android

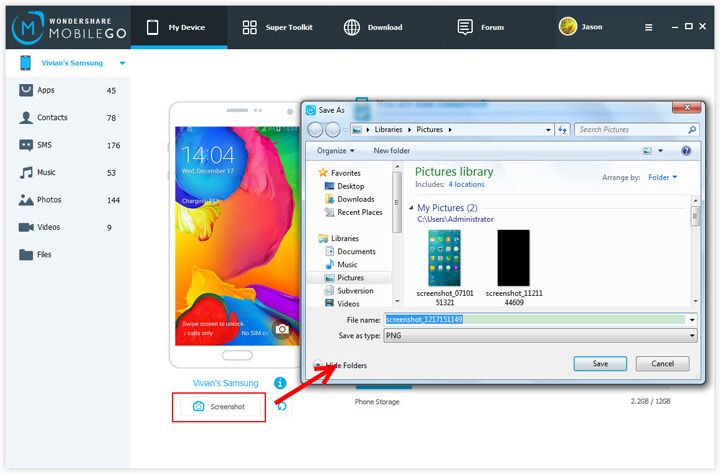
Step 2. Windows file browser comes out. By default, the screenshot will be saved as a PNG file, and named as screenshot_1121144609, screenshot_1121145014 or something like that. You can also rename the screenshot.
Step 3. Click Save to save the Android screen capture on your computer.

capture android screen

Step 4. Then, change a screen on your Android phone or tablet. In the primary window, click capture to refresh the screen to the same one as it on your Android phone or tablet. After that, click android screen capture to capture another screen.

android screen capture capture screen on android

4

Delete Photos on Android Device in Batches

Step 1. Simply click on Photos in the left column.
Step 2. In the photo management window, choose your wanted photos and click Delete. In the pop-up dialog, click Yes.

delete photos from android

Top Page Not Found | Wondershare

404

Oops, looks like you clicked on a broken link - that wasn't meant to happen.